

Issue
- Migrate ESET PROTECT Server from ESET PROTECT Virtual Appliance to Windows Server
Prerequisites:
- ESET PROTECT Virtual Appliance
- New MySQL database using the default name “era_db” and username “root”.

Solution
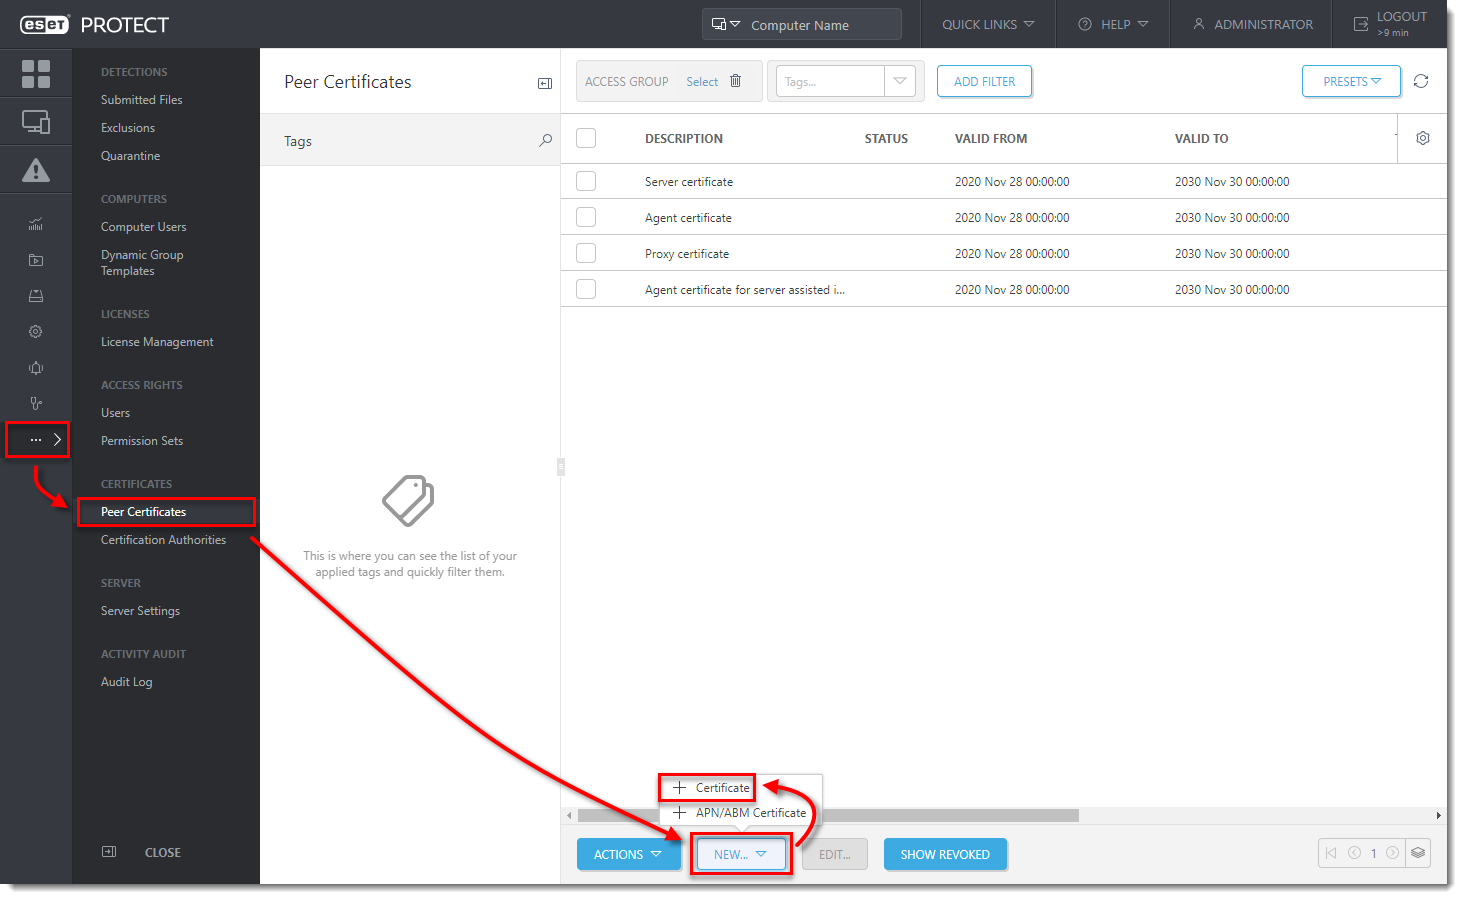
- Generate a new ESET PROTECT Server certificate with connection information for the new ESET PROTECT Server. Log in to your existing ESET PROTECT Virtual Appliance (ESET PROTECT VA) and click More → Peer Certificates → New → Certificate.
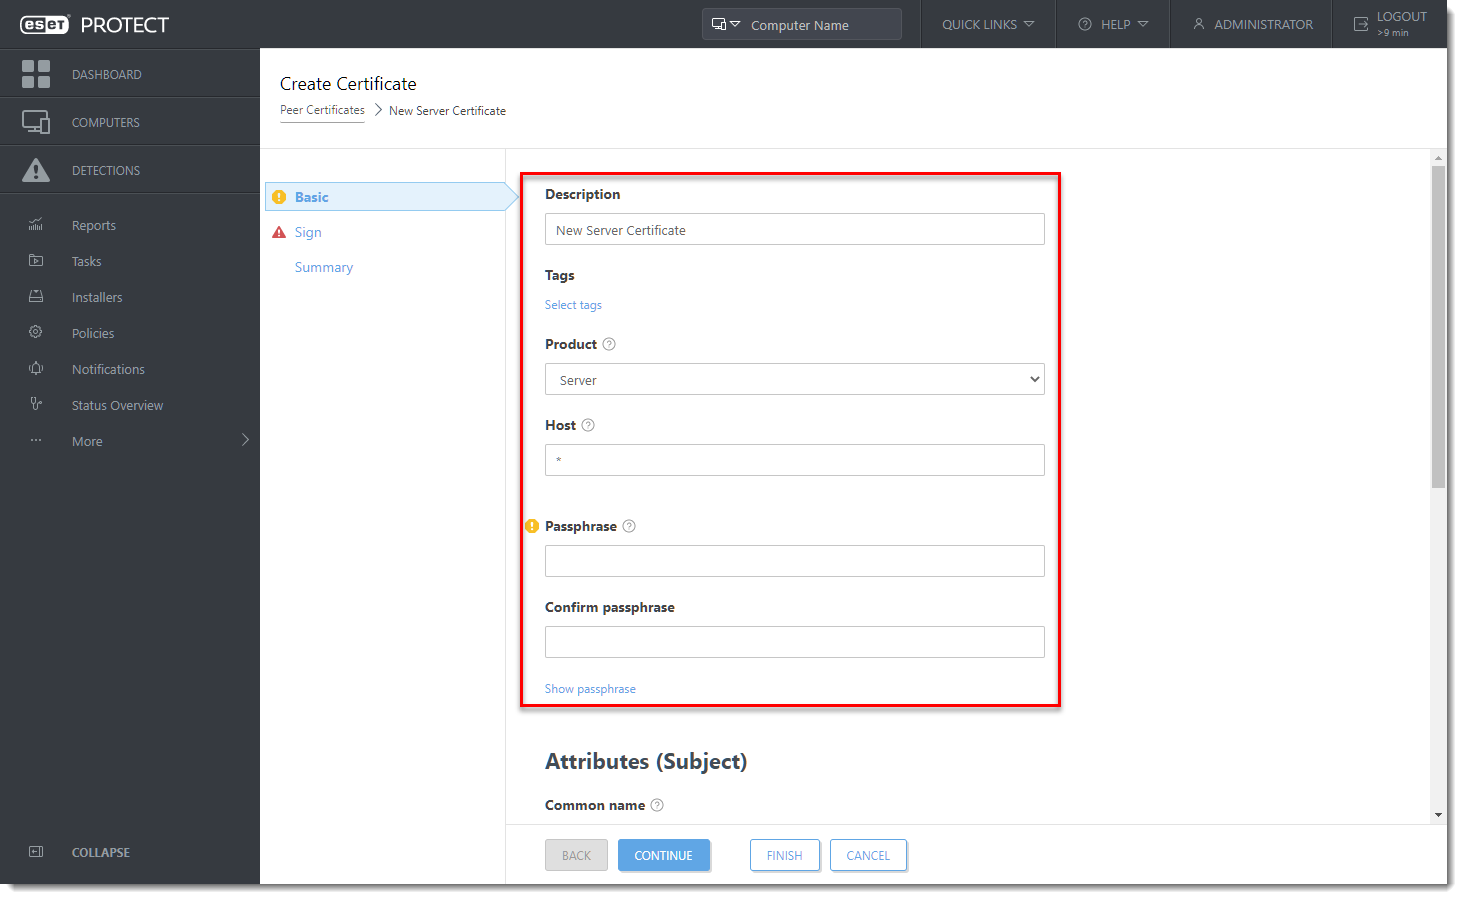
- Type the Description of the certificate. Select Server from the Product drop-down menu. Leave the Host field set to the default value (an asterisk) and leave the Passphrase and Confirm passphrase fields empty.
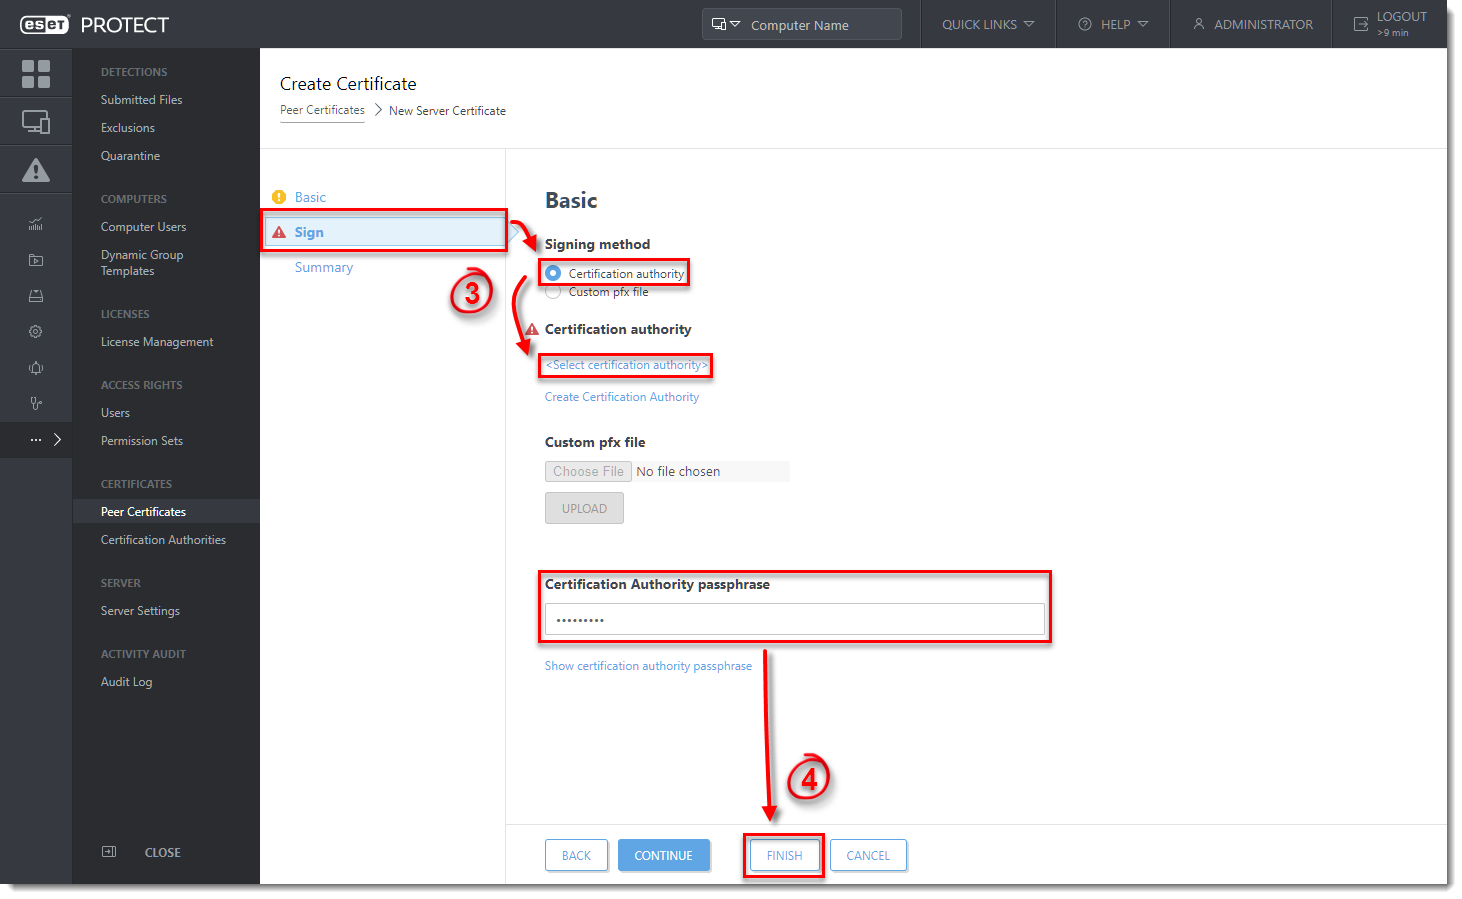
- Click Sign. Select the radio button next to Certification authority under Signing method. In the Certification authority options, click Select certification authority. A new window will open; select the certification authority you want to use to sign a new certificate. Click OK to confirm and return to the previous window.
- Type the Certification Authority passphrase. In this case, it is the same password you use to log into ESET PROTECT Appliance management console. Click the Summary section to review the settings of the new certificate and click Finish to apply.
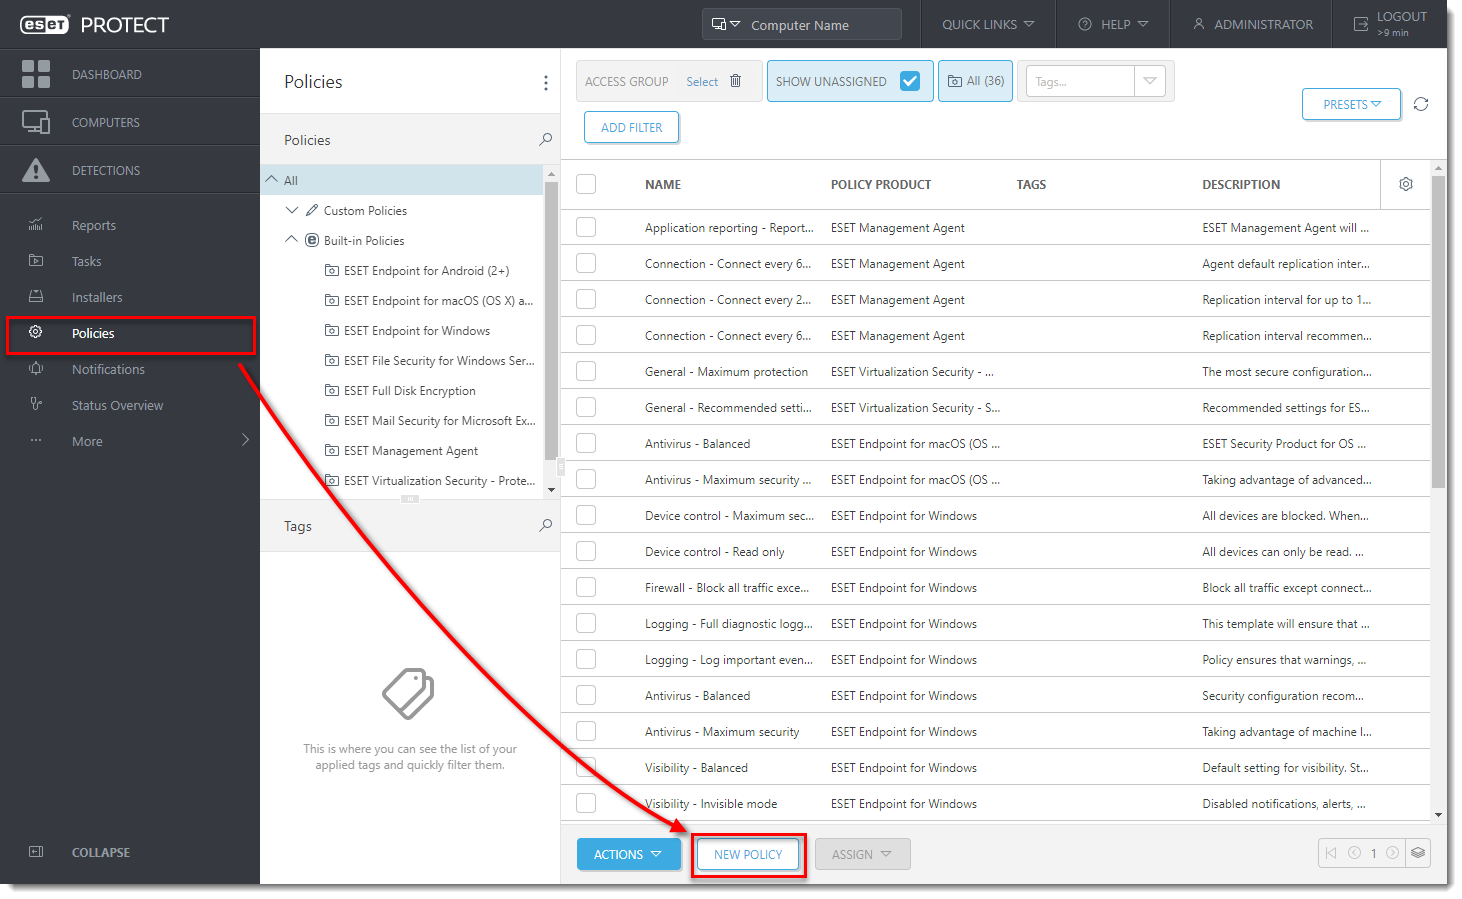
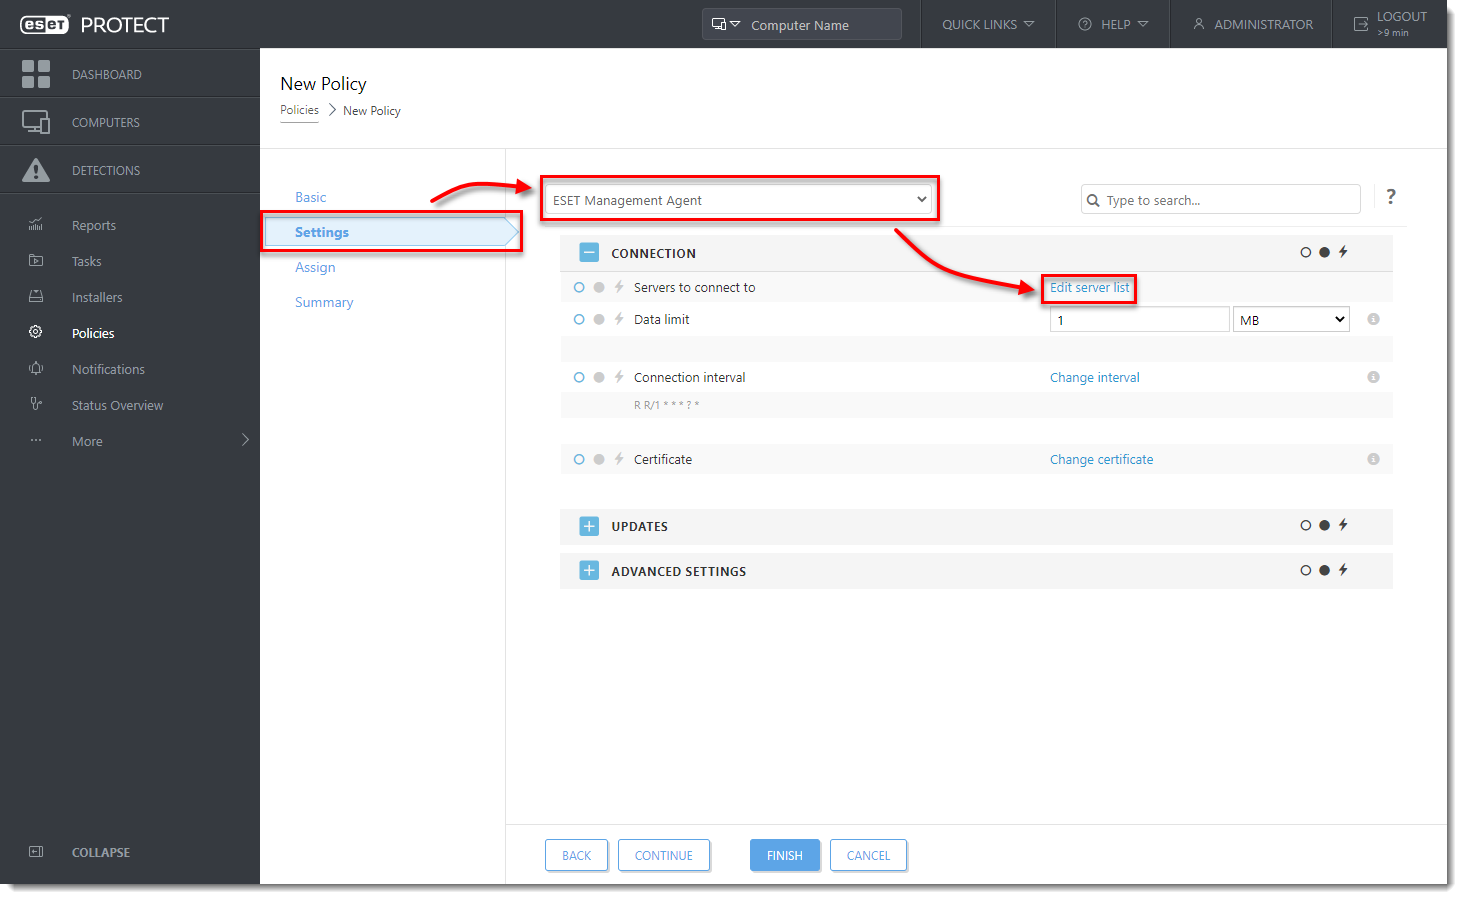
- Create a new policy to set a new ESET PROTECT Server IP address and assign the policy to all client computers. Click Policies → New Policy.
- Enter a name for your policy, the Description field is optional. Click the Settings tab, select ESET Management Agent from the drop-down menu and then click Edit server list.
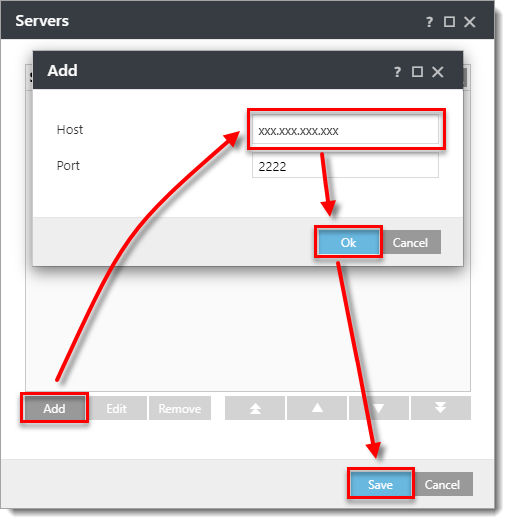
- In the Servers window, click Add. In the host field, type the IP address of your new ESET PROTECT VA in format xxx.xxx.xxx.xxx. If you are using a port other than the default ESET PROTECT Server port 2222, specify your custom port number. Click OK. Make sure your new ESET PROTECT Server address is listed first and click Save.
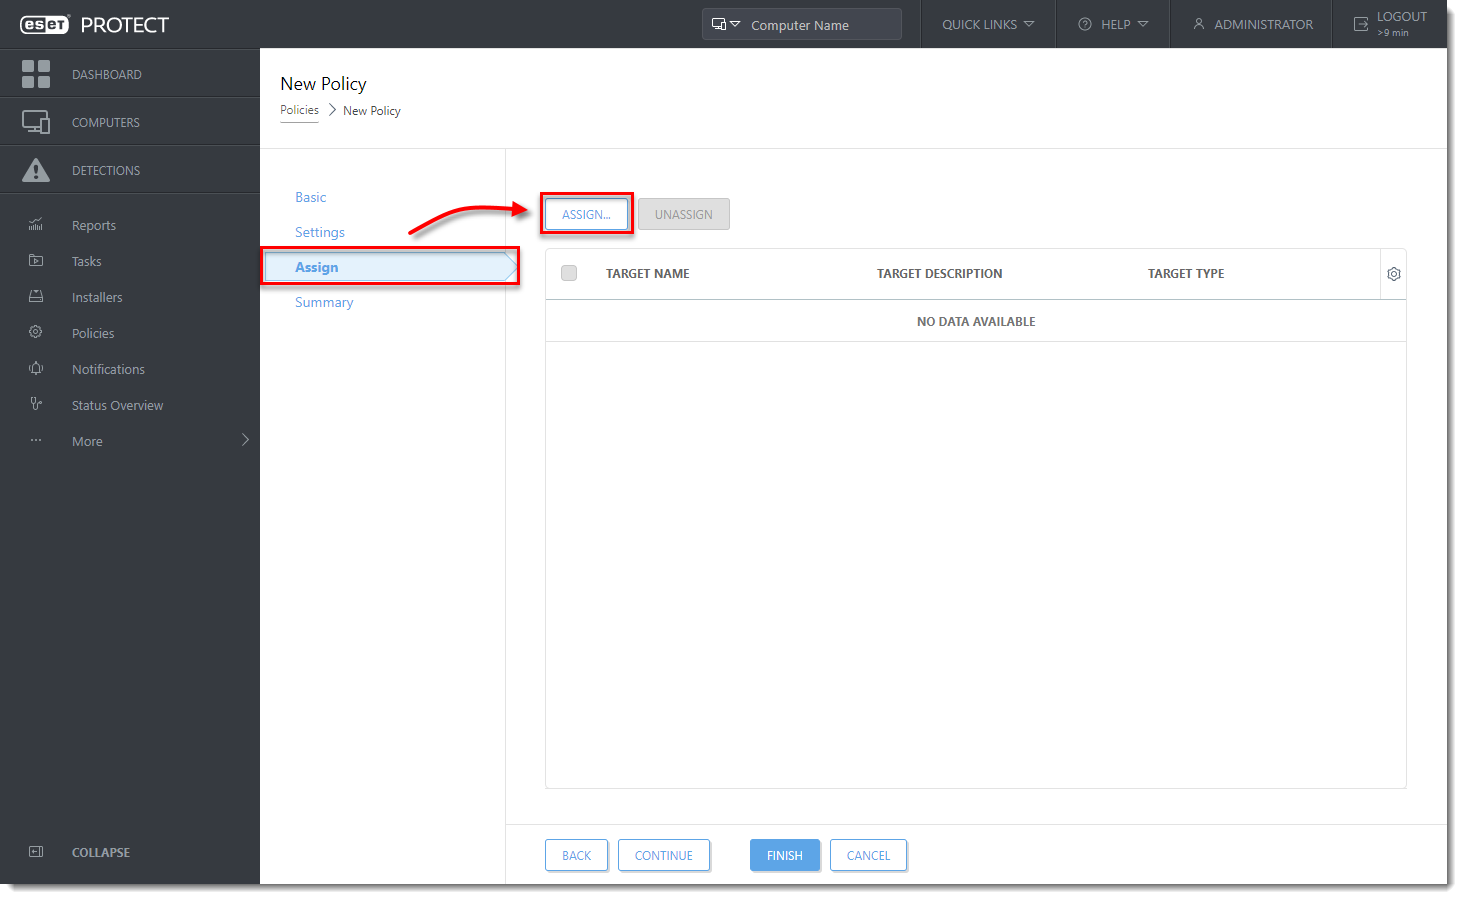
- Click the Assign tab to specify the clients that are targeted by this policy. Click Assign to display a new popup window with all Static and Dynamic Groups
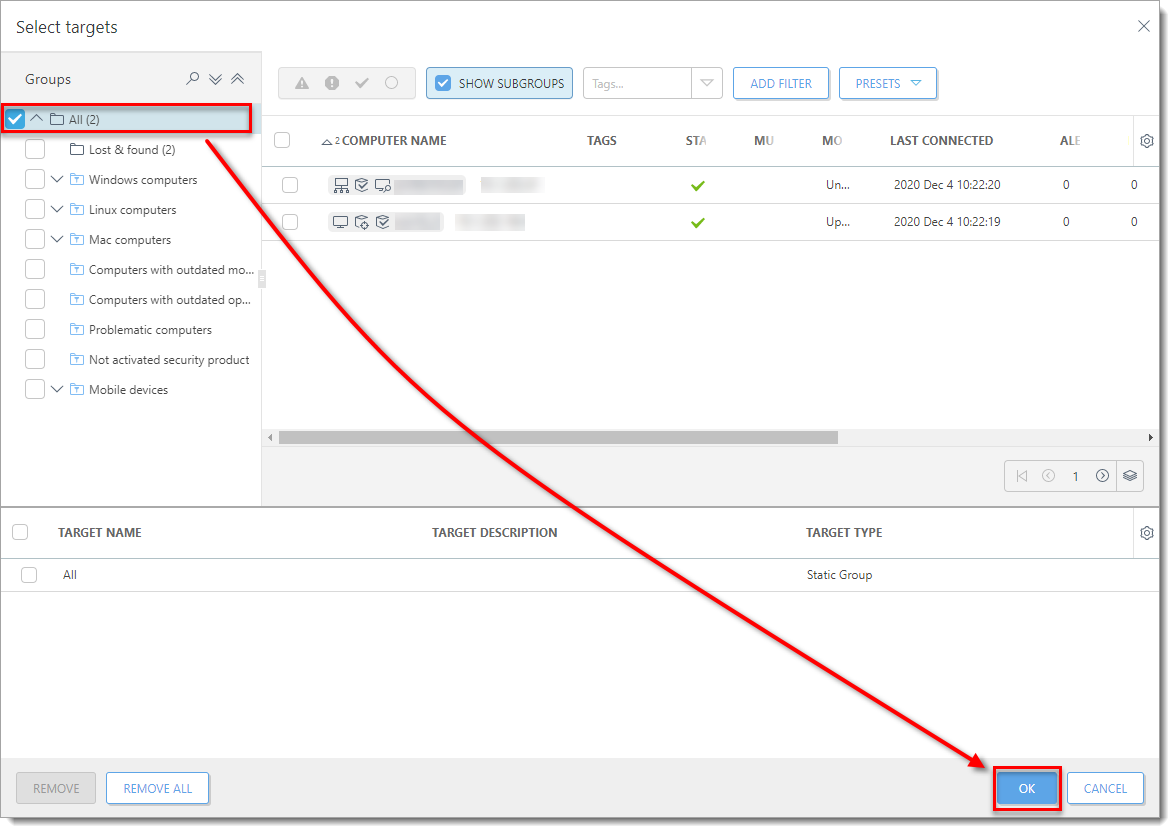
- Select the Static Group All to assign the policy to all connected agents and click OK.
- Review the settings for this policy and click Finish to apply. The time to apply the policy will vary depending on your ESET PROTECT VA configuration.
- When the policy is applied, open ESET PROTECT VA Management Console and create a database backup.
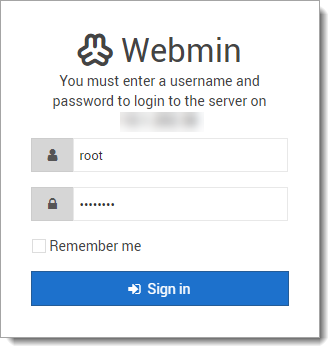
- In the ESET PROTECT Server Appliance management mode menu, select Enable/Disable Webmin interface to enable the Webmin interface. Connect to the Webmin interface using a web browser with the IP address of ESET PROTECT VA and port 10000. A sample address is included here: https://xxx.xxx.xxx.xxx:10000 Log into the Webmin interface using the ESET PROTECT VA credentials where root is the login.
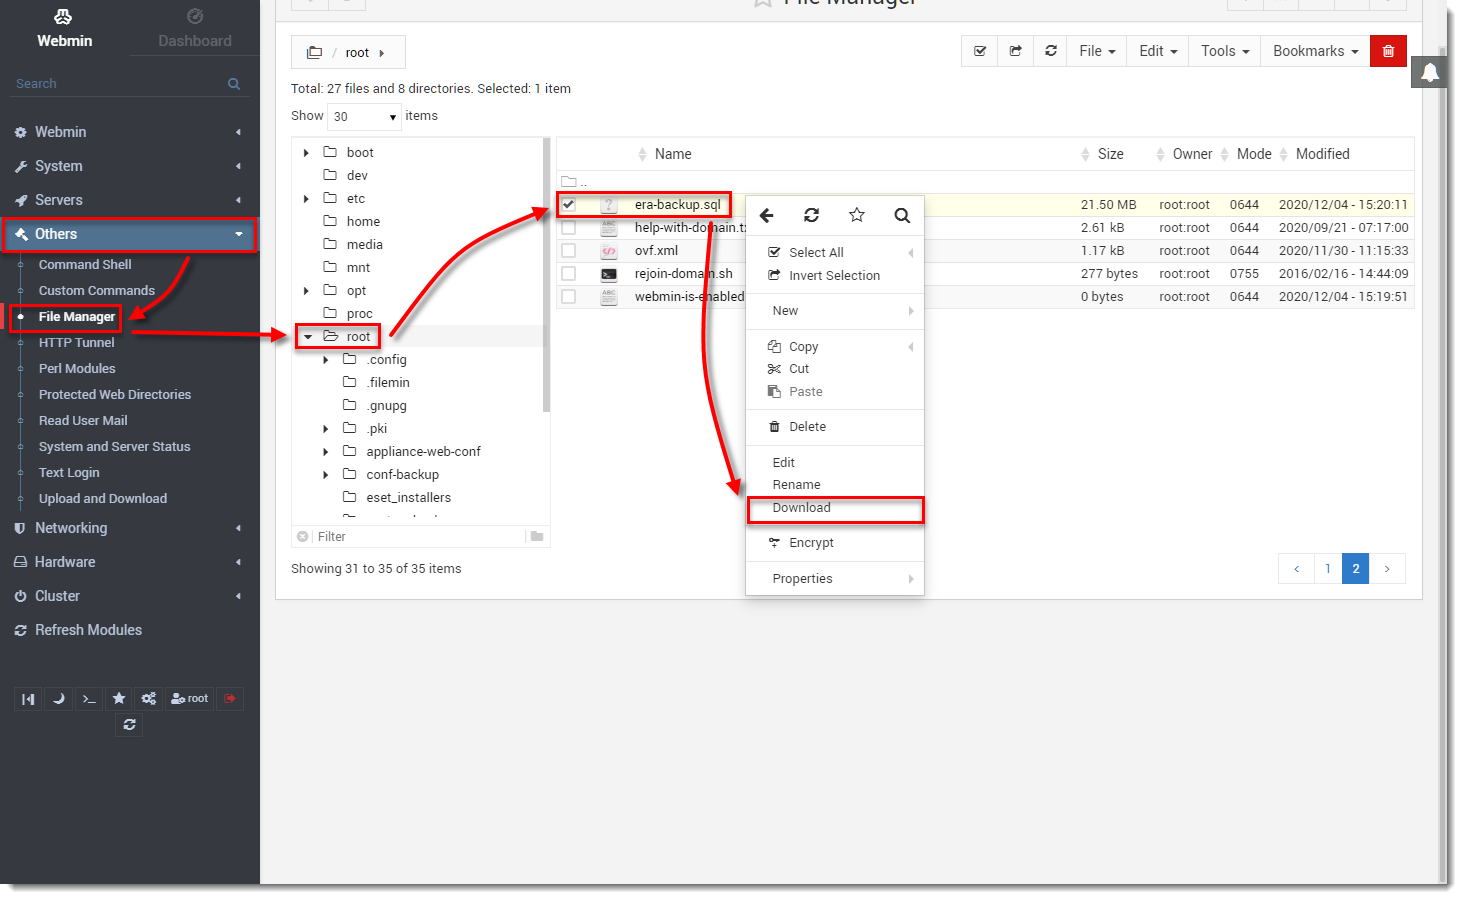
- In the Webmin interface main menu, expand Others and select File Manager. Navigate to the folder /root/. Right-click era-backup.sql file and select Download from the context menu. Save the file to a local drive and then copy it to a location accessible from the target Windows machine.
- Return to the ESET PROTECT VA window, log into the management mode and select Shut down system.
- On the target Windows Server, prepare a clean installation of MySQL Server. When you are prompted by MySQL installer to create a Root Account Password, we recommend that you use the same one you used in ESET PROTECT Server Appliance.
- Before proceeding you must import ESET PROTECT VA database backup to an empty database named era_db on the target MySQL Server. Open a Command prompt and navigate to the MySQL Server binaries folder (default location is C:\Program Files\MySQL\MySQL Server x.x\bin). Enter the following commands, replace TARGETHOST with the address of the target database server.
mysql --host TARGETHOST -u root -p "--execute=CREATE DATABASE era_db /*!40100 DEFAULT CHARACTER SET utf8 */;" - Restore the ESET PROTECT VA backed up database to the previously prepared empty database. Make PATHTOBACKUPFILE the location where you have stored the ESET PROTECT VA database backup:
mysql --host TARGETHOST -u root -p era_db < PATHTOBACKUPFILE - Create an ESET PROTECT database user named root on the target MySQL server. Replace TARGETERAPASSWD with the password you used to log in to ESET PROTECT VA management console:
mysql --host TARGETHOST -u root -p "--execute=CREATE USER root@'%' IDENTIFIED BY 'TARGETERAPASSWD';" - Grant proper access rights for the ESET PROTECT database user - root, on the target MySQL server:
mysql --host TARGETHOST -u root -p "--execute=GRANT ALL ON eradb.* TO root;" - tbl_authentication_certificate table (if you do not remove these records, Agents may fail to connect to the new ESET PROTECT Server):
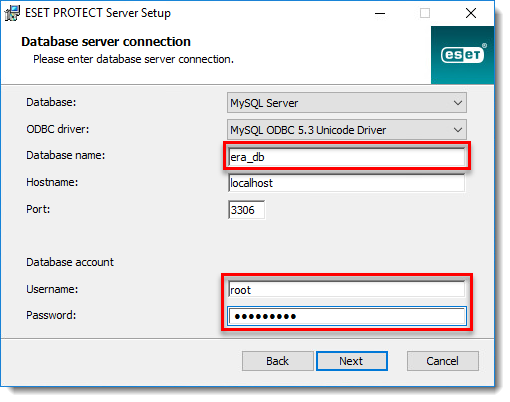
mysql --host TARGETHOST -u root -p "--execute=DELETE FROM era_db.tbl_authentication_certificate where certificate_id = 1;" - Click here to download the ESET PROTECT Server stand-alone component. Execute the installation file and follow the Installation Wizard. When you reach the Database server connection setup in installation, make sure that the MySQL Server and MySQL ODBC Driver are detected properly. The database must be named era_db. In the Database account section, type in the Username "root" and Password you have created in step 18. Click Next to continue. The installer will ask if you want to use the provided user root as a database user for ESET PROTECT, click Yes to apply and continue.
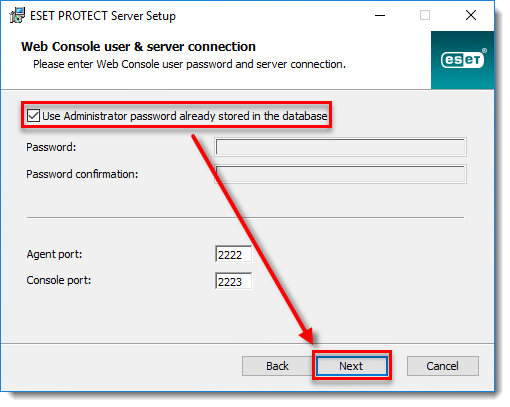
- In the following window, the Installation Wizard will configure an Administrator password for Web Console. Select the check box next to Use Administrator password already stored in the database. Change the Agent and Console port if required to match the settings in ESET PROTECT Server Appliance. The default value for Agent port is 2222 and the default value for Console port is 2223.
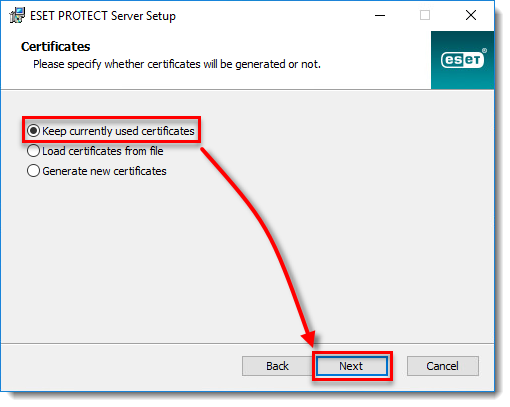
- In the following window, select the radio button next to Keep currently used certificates and click Next to continue. Follow the Installation Wizard to finish the Server component installation.
- Install ESET PROTECT Web Console.
- Open ESET PROTECT Web Console in your web browser and log in.Use your ESET PROTECT Server Appliance password. Verify that the agents have migrated successfully and are connecting to the new server. Do not uninstall your old ESET PROTECT Server Appliance until you have verified the migration was successful.
Reactie toevoegen
Log in of registreer om een reactie te plaatsen.