

Issue
- Upgrade individual ERA components (Agent, Server, Proxy) to the latest ESMC
- Resolve CReplectionModule errors by upgrading to the latest version
Solution
- Upgrade ERA Server using the Components Upgrade Task in the Web Console
- Upgrade ERA Agents on managed computers
Before you start
 Linux users: Upgrade ERA 6.4 (and later) for Linux to the latest version.
If you use an ERA 6.x Proxy component, upgrade your infrastructure with ERA 6.x Proxy.
Prerequisites
Before upgrading to ESMC 7.2, make sure that you have met all ESMC 7.2 installation prerequisites.
Important recommendations before the upgrade
You must have ESET Remote Administrator (ERA) version 6.5 and later to upgrade to ESET Security Management Center 7.2. Check which version of ERA you have installed.
ESMC Server component version 7.2 is not compatible with 32-bit machines (x86 architecture). Upgrading a 32-bit Server machine to 7.2 will fail.
- If you have already run the upgrade and now your system is not working, you need to manually reinstall all ESMC components to the original version.
- If you want to upgrade, you need to migrate your current ESMC to a 64-bit machine, and after successful migration, you can run the upgrade task.
If you have an older unsupported database installed (MySQL 5.5 or MSSQL 2008), upgrade your database to a compatible database version before upgrading the ESMC Server.
Perform a full backup of ERA 6.5:
- Database: Follow these instructions to back up the ERA database.
- Configuration: Copy the
Startupconfiguration.inifile, located at:C:\ProgramData\ESET\RemoteAdministrator\Server\EraServerApplicationData - Certificates: Export the Certification Authorities and Peer Certificates.
- Mobile Device Connector: If this component is used, copy the
Startupconfiguration.inilocated at:C:\ProgramData\ESET\RemoteAdministrator\MDMCore\EraServerApplicationData\Configuration
I use ERA version 6.0 - 6.4
The following steps will upgrade both ERA components (Server, Console) and the ESET Remote Administrator Agent(s) (ERA Agent). When upgrading to the latest version, your policies will be preserved. Update your ERA Server first. Select a few client machines to use as a test for the update and run the task on them (use at least one client from each system/bit category).
Upgrade ERA Server using the Components Upgrade task in the Web Console
Components Upgrade task may take some time to complete
Please be patient during the Components Upgrade task process. It may take some time to complete. Do not restart your ERA Server until the task has completed.
Special characters may cause upgrade to fail
If you have met the requirements for upgrading and your upgrade to the latest version of ESET Security Management Center (ESMC) fails, it could be due to the use of special characters in your ERA password. To resolve this issue, change your ERA password and attempt the upgrade again.
Open ESET Remote Administrator Web Console (ERA Web Console) in your web browser and log in.
- Click Admin
 → Client Tasks → ESET Remote Administrator → Remote Administrator Components Upgrade and click New.
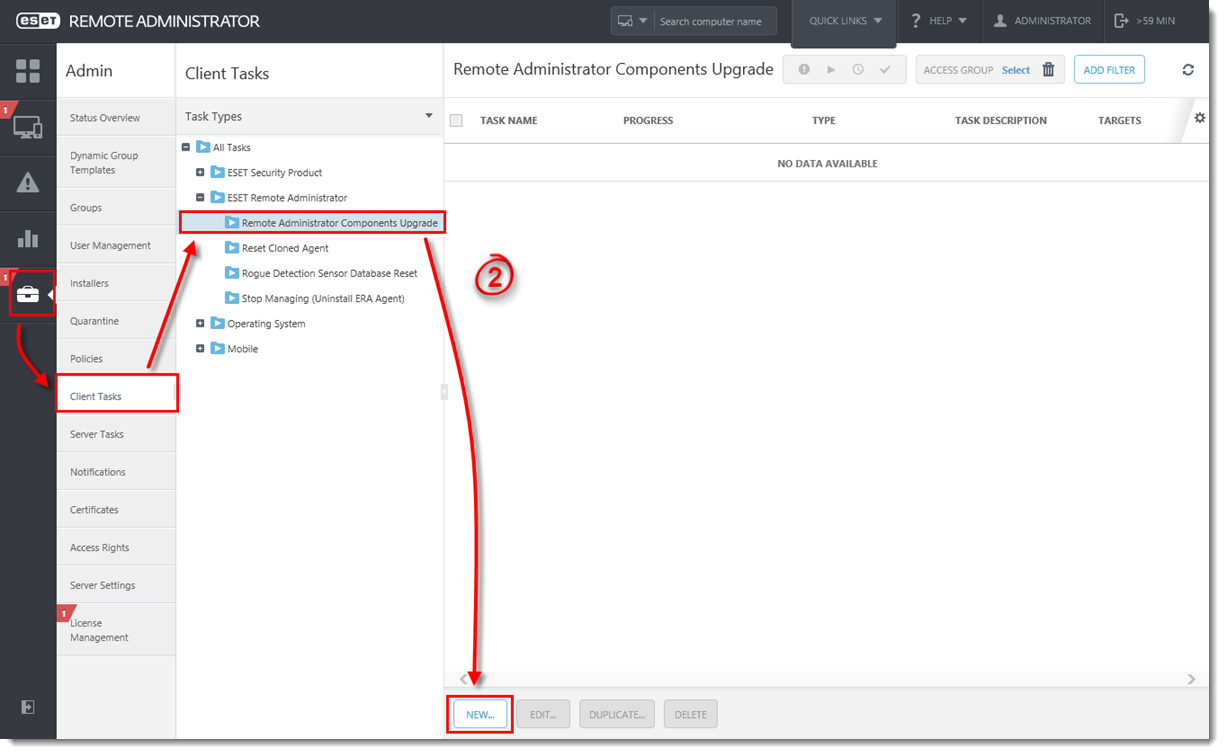
Figure 1-1
Click the image to view larger in new window
- In the Name field, type a name for your task. In the Task drop-down menu, verify that Remote Administrator Components Upgrade is selected.
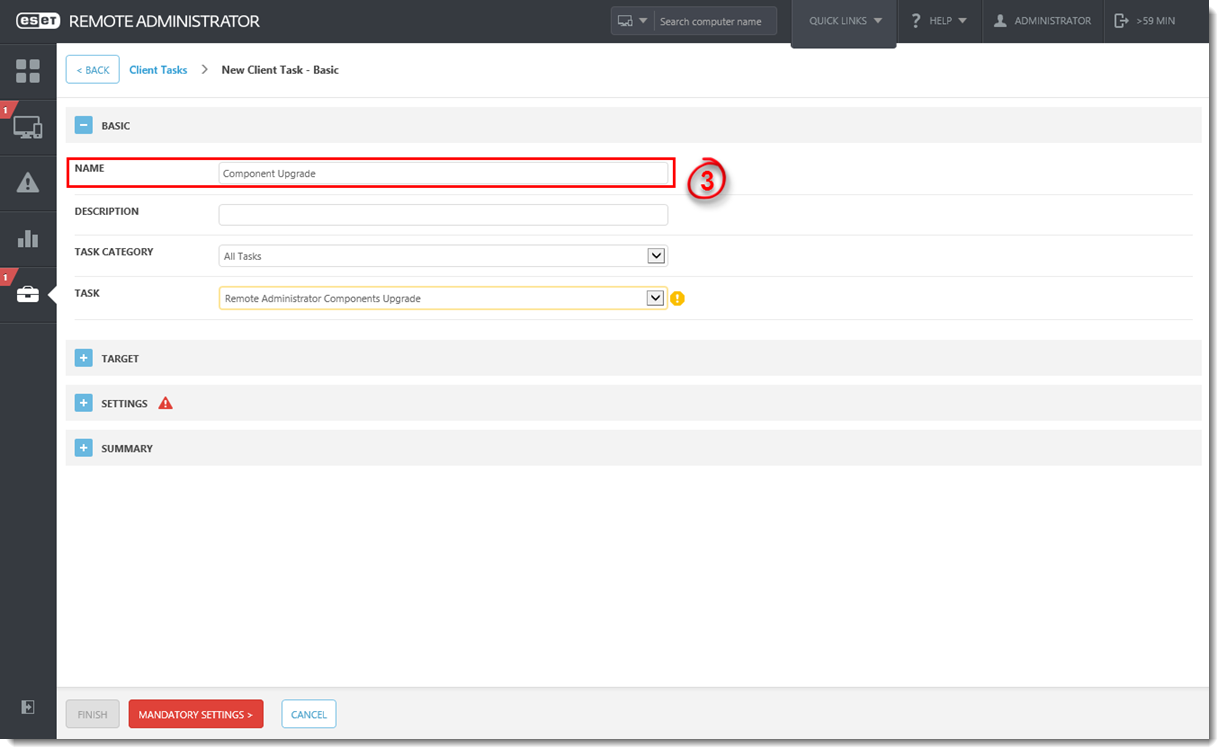
Figure 1-2
Click the image to view larger in new window
- Expand the Settings section, select the check box next to I agree with application End User License Agreement and then click Choose server. We recommend that you also select the check box Automatically reboot when needed.
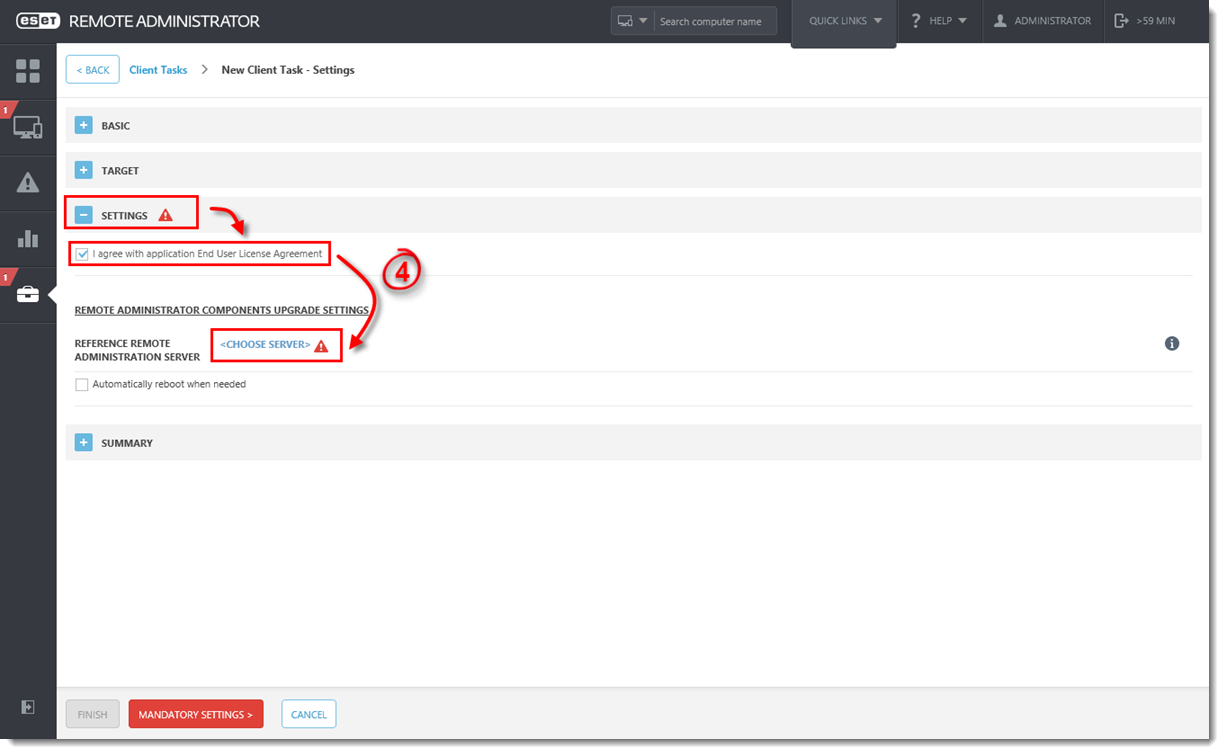
Figure 1-3
Click the image to view larger in new window
Select the ESMC Server you want to upgrade to and click OK.
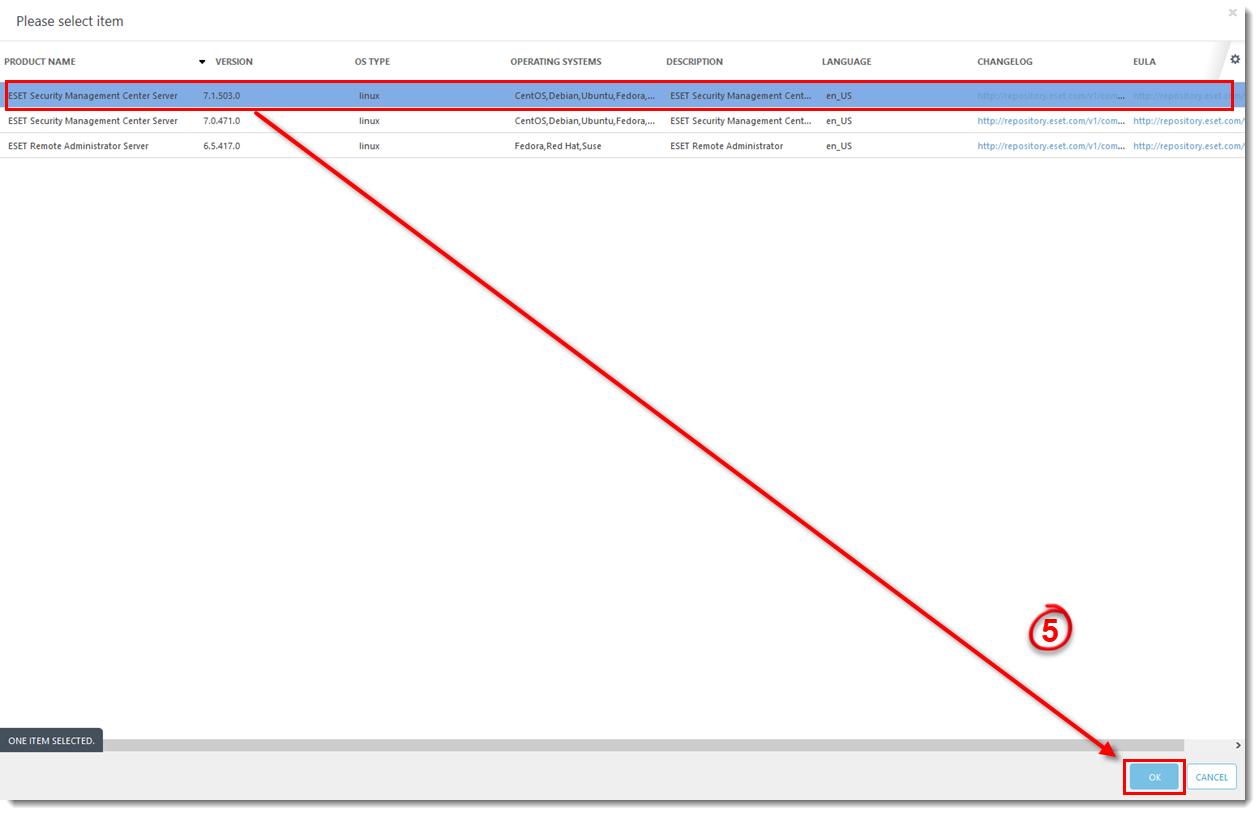
Figure 1-4
Click the image to view larger in new window
- Click Finish.
- Create a trigger and add the ERA Server computer as a target to execute the task.
Do not add more target computers
Add only the computer where ERA Server is installed as a target. Do not add more target computers at this point in the upgrade.
- Wait a few minutes until all ESMC components installed on the server machine are upgraded. Apache Tomcat service can get turned off during the update. If the Web Console is unavailable after the update, open the services management (run
services.msc) and Start the Apache Tomcat service. To verify that your server upgraded to ESET Security Management Center, check Programs and Features in the Control Panel. You will see ESET Security Management Center Server listed as a program if it has been upgraded.

Figure 1-5
Upgrade ERA Agents on managed computers
When the task is finished on the ESMC Server machine, verify that the ESMC Server works properly. Wait an hour to see if any problems occur. Afterward, you can upgrade Agents on the managed computers using the Components Upgrade task and selecting the static group All as its target. See the step-by-step guide.
If you are running a larger network, with hundreds or more client computers:
ERA 6.x Proxy users
If you have ERA 6.5 Proxy installed, read the respective Knowledgebase articles before upgrading other clients.
- Migrate from ERA Proxy (Windows) to Apache HTTP Proxy in ESMC 7
- Migrate from ERA Proxy (Linux or Virtual Appliance) to Apache HTTP Proxy in ESMC 7
Do not upgrade clients behind Proxy before you set up a suitable proxy solution.
- Choose a sample of clients for a test update (include at least one client for each operating system/bit category) and run the task.
- We recommend using Apache HTTP Proxy (or any other transparent web proxy with enabled caching) to limit network load. The test client machines will trigger the download/caching of the installers. When the task is run again, the installers will be distributed to client computers directly from the cache.
- After a successful test update, proceed with the rest of your clients. Alternatively, target the group to All. The upgrade is not performed on computers that have already been upgraded.
If the Components Upgrade task is not working properly, try upgrading Agents using Run Command Client task.
Alternative method: Upgrade ERA Agent(s) using Run Command Client task
This is an alternative method recommended for advanced users or if the Components Upgrade task is unsuccessful.
- Create a new Dynamic Group based on the operating system (32-bit or 64-bit).
- For 32-bit systems:
- Operation "AND"
- Add rule OS edition > OS platform = (equal) 32-bit
- Add rule OS edition > OS type contains Windows
- For 64-bit systems:
- Operation "AND"
- Add rule OS edition > OS platform = (equal) 64-bit
- Add rule OS edition > OS type contains Windows
- For 32-bit systems:
- Create a new Client Task for 32-bit systems.
ESMC Log File location:
The ESMC log file is accessible at: %TEMP%; for example:
C:\Windows\TempSee also log files location for all ESMC components in ESMC User Guide.
- In the Basic section, select Run Command from the Task drop-down menu.
- In the Settings section, in the Command line to run field, type:
msiexec /qn /i "\\SERVER\readonlyshare\Agent_x86.msi" /l*v! %TEMP%\era-agent-upgrade.txt(replaceserverwith your actual server name andreadonlysharewith your share name).- When using the installer package via HTTP:
msiexec /qn /i "http://SERVER/share/agent_x86.msi" /l*v! %TEMP%\era-agent-upgrade.txtmsiexec /qn /i "http://repository.eset.com/v1/com/eset/apps/business/era/agent/v7/7.2.1266.0/agent_x86.msi" /l*v! %TEMP%\era-agent-upgrade.txt
- When using the installer package via HTTP:
- Create Trigger for this Client Task and in the Targets section, select the dynamic group for 32-bit operating systems created in Step 1.
- Create a new Client Task for 64-bit systems.
"MainEngineThread is returning 1619" Error Message:
The installation package is damaged and cannot be opened. Deploy ESET Management Agent with a different installation package.
- In the Basic section, select Run Command from the Task drop-down menu.
- In the Settings section, in the Command line to run field, type:
msiexec /qn /i "\server\readonlyshare\Agent_x64.msi" /l*v! %TEMP%\era-agent-upgrade.txt(replaceserverwith your actual server name andreadonlysharewith share name).- When using installer package via HTTP:
msiexec /qn /i "http://SERVER/share/agent_x64.msi" /l*v! %TEMP%\era-agent-upgrade.txtmsiexec /qn /i "http://repository.eset.com/v1/com/eset/apps/business/era/agent/v7/7.2.1266.0/agent_x64.msi" /l*v! %TEMP%\era-agent-upgrade.txt
- When using installer package via HTTP:
- Create Trigger for this Client Task and in the Targets section, select the dynamic group for 64-bit operating systems created in Step 1.
- To view client task details, click Computers, select the applicable client computer, click Show Details and then click Installed Applications.
There will be a brief period where two versions of Agent are running on a single client machine. This is only temporary. Create an Outdated applications report to monitor the status of client computers hourly.
Add a comment
Please log in or register to submit a comment.