

Issue
After contacting ESET Technical Support, you may be asked to recreate your problem and provide us with the Process Monitor log files.
When are Process Monitor log files needed?
Process Monitor log files are typically required to diagnose issues that recede when ESET real-time protection is disabled.
Solution
- Download Process Monitor from Microsoft Technet and save it to your Desktop.
- Extract ProcessMonitor.zip, double-click Procmon.exe and then click Yes at the prompt. Click Agree if you agree to the conditions in the End-User License Agreement.
- In the main window, click Filter → Enable Advanced Output.
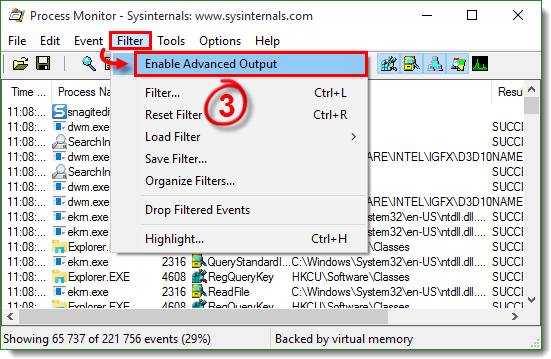
Figure 1-1
- See the appropriate instructions below to gather the specific logs requested by Technical Support:
Gather process log files
- Process Monitor begins recording logs as soon as you open it. Click the magnifying glass icon to stop recording logs.
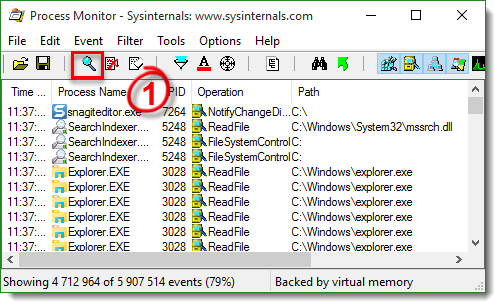
Figure 2-1
- Click the eraser icon to clear the current log files list.
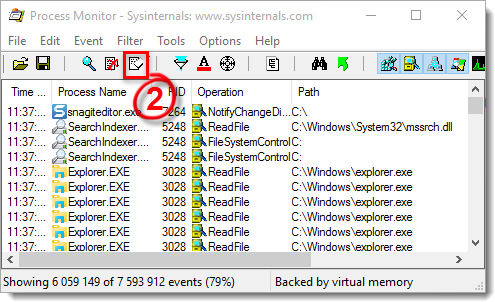
Figure 2-2
- Click the magnifying glass icon to start capturing new log files and then reproduce your issue. After you reproduce your issue, click the magnifying glass again to stop recording logs.
- Click the diskette icon to save your new log files. In the pop-up window, select All events and then select Native Procesess Monitor Format (.PML) option.
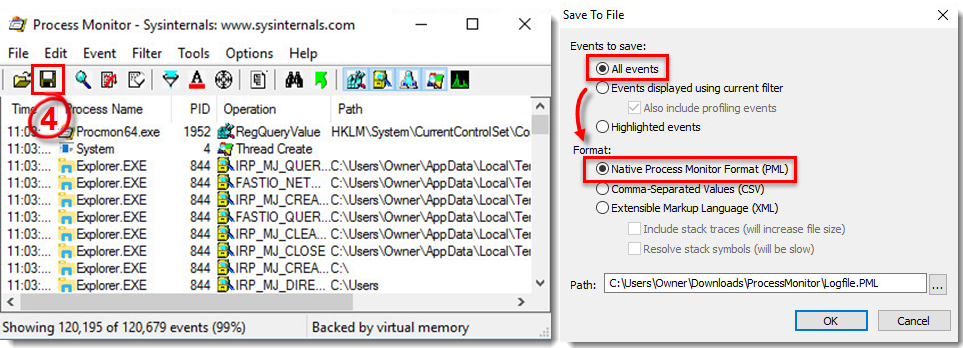
Figure 2-3
- Navigate to the ProcessMonitor folder where you saved the files, you may need to make hidden files visible to see this folder.
- Select the log files, right-click them and then select Send to → Compressed (zipped) folder from the context menu to create a .zip file.
- If you have not already done so, open a case with ESET Technical Support before you submit your .zip file.
- Attach the .zip file to an email reply to ESET Technical Support. A Technical Support representative will examine the log and respond as soon as possible with the recommended action based on their findings.
Gather boot log files
- Click Options → Enable Boot Logging.
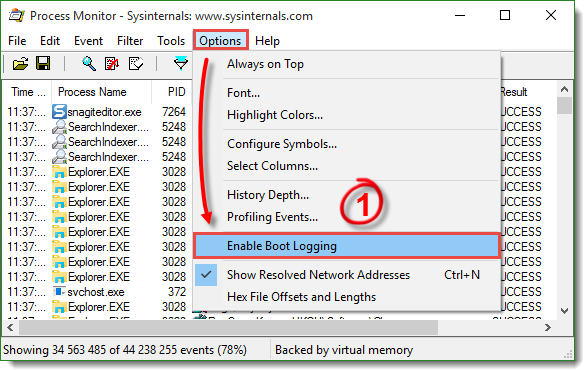
Figure 3-1
- Select the check box next to Generate profiling events to enable it, set the frequency to Every second and then click OK.
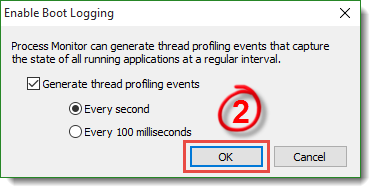
Figure 3-2
- Restart your computer, reproduce your issue and then run Process Monitor. Click Yes at the prompt to save the boot log.
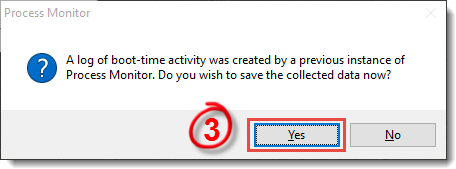
Figure 3-3
- Save the boot log as a Procmon Log (.PML) file and make a note of where it is saved.
- Navigate to the folder where you saved .PML file, you may need to make hidden files visible to see this folder.
- Select the log files, right-click them and then select Send to → Compressed (zipped) folder from the context menu to create a .zip file.
- If you have not already done so, open a case with ESET Technical Support before you submit your .zip file.
- Attach the .zip file to an email reply to ESET Technical Support. A Technical Support representative will examine the log and respond as soon as possible with the recommended action based on their findings.
Running ProcMon against a Remote Machine
Utilizing psexec, you can run ProcMon against a remote machine.
To start the trace on a remote computer run:
Psexec \\<hostname> /s /d procmon.exe /accepteula /quiet /backingfile c:\hostname_trace.pml
Now, to stop the trace on the remote computer run:
Psexec \\<hostname> /s /d procmon.exe /accepteula /terminate
Finally, copy the log file to your remote machine for viewing:
xcopy \\<hostname>\c$\hostname_trace.pml c:\TEMP
You can then view the log file in ProcMon locally by running:
Procmon /openlog c:\temp\hostname_trace.pml
Add a comment
Please log in or register to submit a comment.